


D.I.Y - Tinted & Twine Wrapped Mason Jars
- Kara Lea

- Feb 7, 2018
- 3 min read
Updated: Feb 16, 2018
This is a tutorial not only for creating awesome looking Fishnet Wrapped Mason Jars, but also for tinting them to complete the look!

Here’s what you’ll need:
· Mason Jars (or any other jar you feel like using, the jars I used were not mason jars)
· Twine
· Scissors
· Mod Podge
· Food dye (of your chosen colour)
· Water
· Newspaper (for drying dyed jars on)
Let’s start with tinting the jars:
Step 1 – Mix 4 parts Mod Podge with 1 part water to make up the amount of tint you require. I made about half a cup of tint and it was far more than what I needed for two jars ( I used the left over tinting random things to use it up).
Step 2 – Add your chosen food dye slowly until you achieve the colour you want. As it is only a tint, if you make your colour very pale it will only slightly tint the jar, but a deeper colour will be a more noticeable tint. I mixed together blue and green food bye to make quite a subtle turquoise tint.
Step 3 – Pour your dye into the jar and swirl it around so that it has covered the entire inner surface of the jar. When all of the glass has dye on it, tip out any remainder and place the jar upside down. Leave the jar/s to dry upside down on top of newspaper – mine took about an entire day in the sun plus over night to thoroughly dry.
Once Jars are dry and tinted, you can move onto wrapping them in twine:
Step 1 – Cut a piece of twine to wrap around the top of the jar, cut it and put it aside for now.

Step 2 – Cut 10 lengths of twine to weave into a fishnet on your jar. How long you make these pieces will depend on the size of your jar and the amount of knots you want to tie. I made my string about 2x the length of my jars, the safest measure is to always make them longer – you can always cut off any extra but if they are too short you won’t know until the end of your project and will have to start over (which I did the first time woops).

Step 3 – Tie your 10 lengths of twine to the original piece you cut to go around the top of your jar. Fasten the string there by folding it in half, creating a loop, and feeding the two lengths created back up through the loop. Pull tight to create a knot and repeat for all 10 lengths.

Step 4 – Once all 10 lengths are fastened, wrap the top piece of twin around your jar. Now you are ready to weave!

Step 5 – Grab two lengths of twine, directly next to each other from different knots. Pull into a triangle the size that you want and hold the strings together where you want the knot to be. To create the knot, simply take the two lengths of twine and pull them up, looping them over themselves where you chose the knot to be.
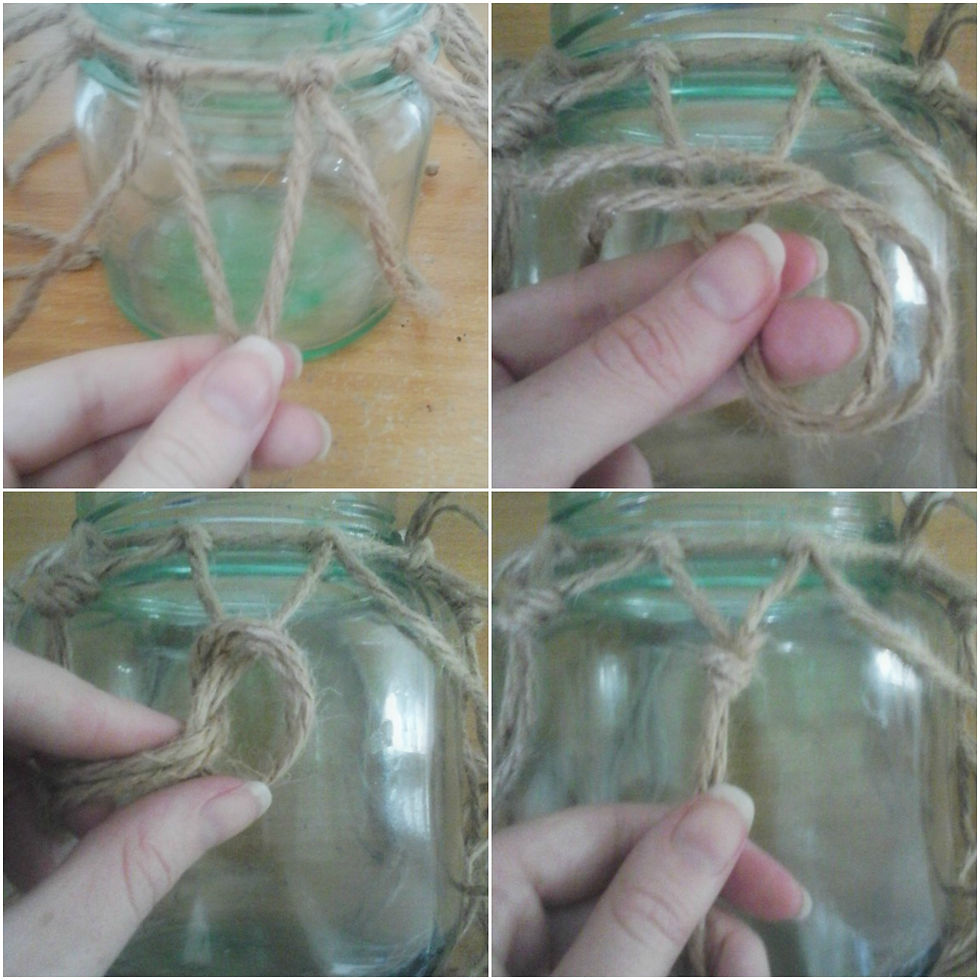
Repeat around the jar until you have your first row of knots, and then continue down the length of your jar until you have created your fishnet look!
Step 6 - Once you have reached the bottom of your jar, cut another piece of twin to wrap around the bottom of the jar, tie it there and then fasten all of your loose ends to this piece.

Cut off any unnecessary bits to make it look tidy, and you have finished your tinted, fishnet wrapped jar! Enjoy!
Comments